Saturday, September 28, 2013

How to install and run the SharePoint (MOSS 2007 and WSS 3.0) Best Practices Analyzer (BPA)

How to Install and Run Best Practice Analyzer (BPA)

1. Run the executable and extract to a folder e.g. C:\SPBPA
2. Open command prompt:
3. cd SPBPA 
4. sharepointbpa.exe -cmd analyze -substitutions SERVER_NAME name_of_your_server
Note: the ‘SERVER_NAME’ is not *your* server name, that is the syntax telling it you about to specify a server – note that text needs to be in upper case too.

Otherwise, you will got the following errors:

Error (The network path was not found) opening registry key reg:/%SERVER_NAME%/HKEY_LOCAL_MACHINE/SOFTWARE\Microsoft\Shared Tools\Web Server Extensions\12.0\Secure\ConfigDB\, skipping object.

Reference:
http://www.brainlitter.com/2008/03/06/how-to-install-and-run-the-sharepoint-moss-2007-and-wss-30-best-practices-analyzer-bpa/ Print Friendly and PDF
Share/Bookmark

Windows Server 2003 DC health check command

The following command will useful for 2003 DC health check:

1. dcdiag.exe /v /f:dcdiag_servname.txt
2. dcdiag.exe /test:dns /v /f:dcdiagdns_servername.txt
3. repadmin /showrepl > replication_servername.txt
4. repadmin /replsum /errorsonly > replicationerr_servername.txt
 
dcdiag.exe
Health check for DCs and/or services assoicated with it.
 
dcdiag.exe /test:dns
Let me know DNS health status
 
repadmin /showrepl
This shows all my replication and if it was successful or not. Just be aware that Global Catalogs will have more infor here than a normal domain controller.
 
repadmin /replsum /errorsonly
This is one takes a long time but will let you know who you are having issues replication with.
 
PS: Please verify on test system before running on production.
 
Print Friendly and PDF
Share/Bookmark

SCOM 2007 SP1 maintenance mode history

To get maintenance mode history, you will need to use SSMS to run the following query to check those maintenance mode history which is available in the OperationsManager database or DW:

select * from dbo.vMaintenanceModeHistory


Reference:

http://blogs.technet.com/b/kevinholman/archive/2009/06/05/maintenance-mode-tying-the-text-of-the-category-to-the-database.aspx

http://www.greypixel.nl/?p=209

Print Friendly and PDF
Share/Bookmark

Thursday, September 12, 2013

Where can I find the product key on a preinstalled version of Windows 8?

1. Go to http://rweverything.com/download/ and download RW-EVERYTHING.

2. Run it.

3. Click on the ACPI Table button at the top. After that click on the MSDM tab. Your BIOS's product key is at the bottom like the following:

image

Reference: http://forums.lenovo.com/t5/Windows-8/Where-can-I-find-the-product-key-on-a-preinstalled-version-of/td-p/931681/page/2

Print Friendly and PDF
Share/Bookmark

(Windows 8.1) Show my desktop background on Start grey out (cannot select)

Problem: "Show my desktop background on Start" will be grey out (cannot select to enable this feature)

Reason: The Windows did not activated.

Solution: Activate the Windows.

Reference:
http://www.nextofwindows.com/how-to-change-windows-8-product-key-to-complete-activation/

Print Friendly and PDF
Share/Bookmark

Google drive desktop shortcut icon become blank after upgrade to Windows 8.1

Problem: Google drive desktop shortcut icon become blank after upgrade to Windows 8.1

image

Solution: Delete the blank icon on desktop and go to “Favorites”, select “Google Drive”, right click and select “Send to” –> Desktop (create shortcut)

image

You will got a new icon:

image

Print Friendly and PDF
Share/Bookmark

Windows 8.1 command prompt fonts size small and cannot change (Upgrade from 8.0 by using Technet ISO)

If you find command prompt fonts size very small, cannot change fonts size of Raster Fonts and cannot select fonts and size of fonts is missing.

The solution is go to the C:\Windows.old\Windows\Fonts to copy all the fonts to C:\Windows\Fonts, then reboot the computer.

You will got those option back:

image

Print Friendly and PDF
Share/Bookmark

Saturday, August 24, 2013

SharePoint Server 2007 Upgrade from SP2 to SP3 + ALL CU package

The steps at the following:

  1. Windows Update all OS patch
  2. SQL Server 2005 upgrade to SP4 and then apply (Post SP4) CU3
  3. Apply Upgrade WSS SP3 (WSSv3SP3-kb2526305-x64)
  4. Apply upgrade Office Server 2007 SP3 (KB252699-X64-fullfile)
  5. Apply ALL CU Package (ubersharepoint2007-kb2817328)
Print Friendly and PDF
Share/Bookmark

Re-install the SCOM agent from SCOM console

  1. Go to “Administration” -> “Device Management” -> “Agent Managed”

  2. Find the problematic monitored server

  3. Select it and go to “Actions” -> Uninstall....

  4. After the uninstall completed, select the “Agent Managed” again, right click and select “Discovery Wizard”

  5. Add the problematic monitored server again to start to re-install SCOM agent

  6. After the reinstall completed, go to “C:\Program Files\System Center Operations Manager 2007\HelperObjects” to copy the “OOMADs.msi” to this folder.

  7. Check the “Managed agent” status of the server and also the event log of the problematic monitored server.

Print Friendly and PDF
Share/Bookmark

SCOM 2007 reconnect those disconnected "Not monitor" agent

SCOM 2007 reconnect those disconnected "Not monitor" agent

  1. Login the problematic monitored server (client)
  2. Stop the “OpsMgr Heath Service”
  3. Go to “C:\Program Files\System Center Operations Manager 2007”
  4. Rename the folder “Health Service State”
  5. Go to SCOM console
  6. Go to “Administration” -> “Device Management” -> “Agent Managed”
  7. Find the problematic monitored server
  8. Select it and go to “Actions” -> “delete”

  9. Go back to the problematic monitored server

  10. Restart the “Health Service State”

  11. Check the “Managed agent” status of the server and also the event log of the problematic monitored server.

Print Friendly and PDF
Share/Bookmark

Thursday, August 22, 2013

Remote Desktop Services Uses the wrong Certificate - You receive various certificate related error messages when connecting to a Terminal server that is running Windows Server 2008 or Windows Server 2008 R2

When you try to connect to Windows Server 2008/2008 R2, you receive the following errors:

Name in the certificate from the remote computer:
 
<Not match>
 
The solution is login into this server and follow the following procedure:

1. go to Run and enter "mmc.exe"
2. add the add-in - certificates (for the computer account) (and select local computer)
3. navigate to the remote desktop folder -> certificates
4. delete the certificate for the name of the server and close the mmc instance
5. go to: administrative tools -> remote desktop services -> remote desktop session host configuration
6. select the instance in the main window - rdp -tcp -> right click and select properties
7. on the window that pops up, select default
8. restart the remote desktop service

Reference:

http://rivald.blogspot.com/2011/06/replacing-self-signed-remote-desktop.html

http://support.microsoft.com/kb/2000960

Print Friendly and PDF
Share/Bookmark

How to using GPO ADMX under Windows Server 2003 DC environment

Instead of create the Central Store for Group Policy Administrative Template files in netlogon

You can also copy all the .admx file to “%windir%\PolicyDefiitions\” to all Windows 7 client

Then, install the Remote Server Administration Tools (RSAT) for Windows 7 to a Windows 7 machine and you will able to edit and deploy those new GPO.

Reference:

http://support.microsoft.com/kb/929841/en-us

http://msdn.microsoft.com/en-us/library/bb530196.aspx

http://social.technet.microsoft.com/Forums/en-US/winserverGP/thread/846e1ccb-c9ba-474f-81ee-7106be104d39

Print Friendly and PDF
Share/Bookmark

Tuesday, August 20, 2013

Qualcomm atheros ar5bwb222 wireless network adapter (on Acer V5-571G) for windows 8 x64

The Driver version 10.0.0.234 is seems to be more stable than the Acer driver download page one, you can download the following driver and test on your Acer V5-571G.

image

Drivers for Atheros AR5BWB222 and Windows 8
http://www.atheros.cz/atheros-wireless-download.php?chipset=74&system=8 Print Friendly and PDF
Share/Bookmark

How to run 16GB RAM (8GB x 2) on Acer V5-571G?

How to run 16GB RAM (8GB x 2) on Acer V5-571G?

If the laptop is running on 1.x BIOS, please upgrade the BIOS to 1.22

Download Acer BIOS 1.22

image

After that you will find your Acer V5-571G support 16GB RAM:

image

Print Friendly and PDF
Share/Bookmark

How to display Full Screen when using ATI (AMD) Radeon under 1920 x 1080?

When you change your resolution to 1920 x 1080, you may find you cannot display the Full screen of your LCD/LED monitor via HDMI connection.

The solution is go to “AMD Vision Engine Control Center”:

  1. My Digital Flat-Panels
  2. Scaling Options ( Digital Flat-Panel)
  3. Drag from Underscan (15%) to Overscan (0%) until the screen full to the corner of your monitor.

image

The AMD VISION Engine Control Center:

image

The display card which is using:

image


The monitor which is using AOC E2461FWH

http://www.aocmonitorap.com/root/hk_en/product_display.php?id=437


Reference:

http://www.justin.my/2011/12/cannot-display-full-screen-using-ati-amd-radeon/

Print Friendly and PDF
Share/Bookmark

Monday, August 12, 2013

HP ProLiant Server shutdown show “The system has halted” when it is install Dialogic Brooktrout Fax card

When a HP ProLiant Server shutdown and show “The system has halted” like the following:

image

It will be happen if the server is install a Windows Server 2008 R2 and also a Dialogic Brooktrout Fax card have been installed.

The issue is caused by the way in which the board is put into a low power state before the operating system shutdown.

Solution:

1. Change/Add the following registry:

image

2. Change BIOS setting:

The Minimum Processor Idle Power State has been configured for "No C-states" or "C1E State."

And/OR

The Intel QPI Link Power Management is set to "Disabled."

And/OR

The HP Power Profile is configured for "Maximum Performance."

Print Friendly and PDF
Share/Bookmark

AMD Bulldozer CPU Windows 7 hotfix

There are two hotfix will need to apply if you are using AMD Bulldozer-based CPU on Windows 7 PC

KB2645594

http://thehotfixshare.net/board/index.php?autocom=downloads&showfile=14474

KB2646060

http://support.microsoft.com/kb/2646060

Reference:

http://www.techbang.com/posts/8635-free-amd-fx-real-combat-effectiveness

http://www.techpowerup.com/158534/new-windows-7-bulldozer-patches-available.html

Print Friendly and PDF
Share/Bookmark

Sunday, August 11, 2013

Virtual wifi hotspot Win7/Win8

Instead of using Windows 7/8 built in feature to create Virtual WiFi Hotspot feature, there are other freeware Virtual WiFi Hotspot

http://virtualwifihotspot.codeplex.com/ will able to turn your machine (which is equipped WLAN card/connection) into a Wi-Fi hotspot. Users can wirelessly share any internet connection (Wifi, LAN, Cable Modem, Dial-up, Cellular, etc.) with any Wifi device (Laptop, Smart Phone, iPod Touch, iPhone, Android Phone, Zune, Netbook, wireless printer, etc.)
 
 
Print Friendly and PDF
Share/Bookmark

La Fonera Firmware 0.7.1 r2 to enable SSH and upgrade to DD-WRT firmware and also how to restore a DD-WRT ROM if upgrade fail

La Fonera Firmware 0.7.1 r2 to enable SSH and upgrade to DD-WRT firmware and also how to restore a DD-WRT ROM if upgrade fail

For initiate IP address:

169.254.255.1 /24

Default root account username and password
root /admin

Latest ROM

http://www.dd-wrt.com/routerdb/de/download/FON/LaFonera/2100/linux.bin/3593

2010-08-09

FON 0.7.1 r2 to enable SSH

1. Hardreset the AP by press “reset button”

2. The firmware become LanFonera Firmware 0.7.0 r5

3. Login FON and change the DNS to 88.198.165.155

4. Reboot the FON

5. Connect it via Wireless (Private SSID)

6. You will able to use SSH to connect to FON (IP: 192.168.10.1) (Username: root and Password: admin)

7. In the console, enter the following command:

# vi /etc/firewall.user

Remove the "#" in line 22, 23

# cd /etc/init.d

# mv dropbear S50dropbear

# passwd (Recommend to change it)

# sync

* Do not run the upgrade firmware in the admin webpage, the manual upgrade will cause the SSH port close.

Remark: You will need to change the Internet connection to DHCP or Static IP. PPPoE and PPTP did not able to change DNS setting. (You will need a SOHO router to solve this problem)

Reference:
http://tw.myblog.yahoo.com/jw!H0yGgI2LBRZnnqD_g3JoVsLJ/article?mid=13849

How to flash DD-WRT to FON? (Remark: The FON firmware version is or below 0.7.1 r1 and SSH have been enabled) (If you follow the above steps to enable SSH, your FON is already ready for flash DD-WRT)

File required:
1.                  openwrt-ar531x-2.4-vmlinux-CAMICIA.lzma <http://fonera.info/camicia/openwrt-ar531x-2.4-vmlinux-CAMICIA.lzma>

2.                  out.hex <http://fonera.info/camicia/out.hex>

3.                  DD-WRT firmware <http://www.dd-wrt.com/site/support/router-database> (for FON 2100: linux.bin <http://www.dd-wrt.com/routerdb/de/download/FON/LaFonera/2100/linux.bin/3593> )

Tools:

1.                  PuTTY <http://www.chiark.greenend.org.uk/~sgtatham/putty/>

2.                  tftpd <http://tftpd32.jounin.net/>

3.                  HFS <http://www.rejetto.com/hfs/>

4.                  Open a text file, copy the following text and save it as "step1.html"

            <html>
            <head>
            </head>
            <body>
            <center>
        <form method="post" action="http://192.168.10.1/cgi-bin/webif/connection.sh" enctype="multipart/form-data">
        <input name="username" value="$(/usr/sbin/iptables -I INPUT 1 -p tcp --dport 22 -j ACCEPT)" size="68" >
        <input type="submit" name="submit" value="Submit" onClick="{this.form.wifimode.value='";' + this.form.wifimode.value +';"'}" />
        </form>
        </body>
        </html>

5.                  Open a text file, copy the following text and save it as step2.html

        <html>
        <head>
        </head>
        <body>
        <center>
        <form method="post" action="http://192.168.10.1/cgi-bin/webif/connection.sh" enctype="multipart/form-data">
        <input name="username" value="$(/etc/init.d/dropbear)" size="68" >
        <input type="submit" name="submit" value="Submit" onClick="{this.form.wifimode.value='";' + this.form.wifimode.value +';"'}" />
        </form>
        </body>
        </html>

The procedure of flash DD-WRT firmware at the following:

1. Remove the Internet connection   

2. Power on FON and wait for the WLAN light up, then press reset about 30 sec and the WLAN light off.

3. Wait for FON restart and WLAN light up again.

4. Connect FON to your PC

5. Open steps1.html and click submit, then enter username: admin and password: admin

6. Open steps2.html and click submit 

7. Run HFS and add openwrt-ar531x-2.4-vmlinux-CAMICIA.lzma and out.hex to the Root folder

8. Use PuTTY to connect FON via SSH (Username: root and password: admin)

9. Run the following command:    

# cd /tmp
# wget http://169.254.255.2:8080/openwrt-ar531x-2.4-vmlinux-CAMICIA.lzma
# mtd -e vmlinux.bin.l7 write openwrt-ar531x-2.4-vmlinux-CAMICIA.lzma vmlinux.bin.l7
# reboot

Remark: vmlinux.bin.l7 , the "l" is the lowercase letter "L"

10. After the reboot completed, use SSH to reconnect FON and run the following command:

# cd /tmp
# wget http://169.254.255.2:8080/out.hex
# mtd -e "RedBoot config" write out.hex "RedBoot config"
# reboot

11. After the reboot completed, change computer IP address to 192.168.1.166 and submask to 255.255.255.0

12. Use the LAN cable to connect to FON (The WLAN light is off now) (Remark: If FON ip is 169.254.255.1 and then change computer IP to 169.254.255.2)

13. telnet 192.168.1.254 9000 (Keep ping 192.168.1.254 and try to telnet to FON. There are around 10 sec able to connect to RedBoot) (If you miss it you will need to reboot it.)

(If it keep fail to connect to FON via 192.168.1.254, please change computer IP to 169.254.255.2 and telnet 169.254.255.1)

14. Run tftpd and put linux.bin to tftpd same folder

15. Run the following command: 

       RedBoot> ip_address -l 192.168.1.254/24 -h 192.168.1.166

You will see the following message:      
IP: 192.168.1.254/255.255.255.0, Gateway: 0.0.0.0
        Default server: 192.168.1.166

Run the following command:
        RedBoot> fis init
        About to initialize [format] FLASH image system – continue (y/n)? y

You will see the following message:

        *** Initialize FLASH Image System
        … Erase from 0xa87e0000-0xa87f0000: .
        … Program from 0×80ff0000-0×81000000 at 0xa87e0000: .

16. Run the following command:

        RedBoot> load -r -b 0×80041000 linux.bin

You will see the following message:
        Using default protocol (TFTP)
        Raw file loaded 0×80041000-0×806a0fff, assumed entry at 0×80041000

Run the following command:
RedBoot> fis create linux

Then Wait for 10 mins, you will saw the following message:

        … Erase from 0xa8030000-0xa8690000: …………………………………………………………………………………………
        … Program from 0×80041000-0×806a1000 at 0xa8030000: …………………………………………………………………………………………
        … Erase from 0xa87e0000-0xa87f0000: .
        … Program from 0×80ff0000-0×81000000 at 0xa87e0000: .

17. Run the following command:

        RedBoot> fconfig
        Run script at boot: true

You will see the following message:
        Boot script:
        .. fis load -l vmlinux.bin.l7
        .. exec
        Enter script, terminate with empty line

Run the following command:
        >> fis load -l linux
        >> exec
        >>
        Boot script timeout (1000ms resolution): 10
        Use BOOTP for network configuration: false
        Gateway IP address:
        Local IP address: 192.168.1.254
        Local IP address mask: 255.255.255.0
        Default server IP address:
        Console baud rate: 9600
        GDB connection port: 9000
        Force console for special debug messages: false
        Network debug at boot time: false
        Update RedBoot non-volatile configuration – continue (y/n)? y

You will see the following message:
        … Erase from 0xa87e0000-0xa87f0000: .
        … Program from 0×80ff0000-0×81000000 at 0xa87e0000: .

Run the following command:
RedBoot> reset

After the boot, you will able to connect to FON via 192.168.1.1, you will ask for setup administrator account

Reference:
http://geek.no19.com/2010/03/fon-dd-wrt.html#tools
LaFonera Software Flashing on DD-WRT.com <http://www.dd-wrt.com/wiki/index.php/LaFonera_Software_Flashing>
DD-WRT on Research & Development <http://ims.tw/archives/417>

How to restore ROM after the flash rom failure

1. Change your PC LAN IP address to 192.168.1.x (e.g. 192.168.1.2)

2. Direct connect you PC LAN to FON LAN (Keep the FON POWER OFF)

3. Start to ping 192.168.1.254

4. Open putty to get ready to telnet 192.168.1.254 9000 (Do not connect at this step)

5. Power On FON

6. When seen ping got reply from 192.168.1.254 (Only few seconds), press telnet immediately

7. You will able to enter the redboot again

8. Now, you will able to flash any rom to FON.

Reference: http://alvinj.net/2009/02/19/5/

Print Friendly and PDF
Share/Bookmark

Thursday, June 27, 2013

How to manually install the 5600 Engine Update for VirusScan Enterprise 8.x (Also some reference about 8.7 5600 engine update)

To manually install the 5600 Engin Update for VirusScan Enterprise 8.x, you can follow the steps of the following kb:

https://kc.mcafee.com/corporate/index?page=content&id=KB68575

Remark: If you are using VirusScan Enterprise 8.7, you must upgrade to Patch 5 and also install Hotfix 777352

For more information:

VirusScan Enterprise 8.7i Patch 5 and Hotfix 777352 are required for VSE 8.7i to install the 5600 Anti-Malware Engine
https://kc.mcafee.com/corporate/index?page=content&id=KB75459

You will able check the Patch level at “About VirusScan Enterprise”:

image

And the Hotfix 777352 at the following registry (If you are using Windows XP)

image

After the update success, you will able to check the engine version become “5600.1067”

image

* Optional: Upgrade the McAfee agent to 4.6 patch 3 or above (e.g. 4.8) ** The VSE 8.7i with patch 5 is supported by MA 4.6 or above

(Remark: The agent 4.6 patch 3 have a unsolved security vulnerability, for more information: McAfee Security Bulletin – McAfee ePO Extension for McAfee Agent 4.5 and 4.6 Blind SQL Injection Vulnerability)

 http://kc.mcafee.com/corporate/index?page=content&id=SB10043

Print Friendly and PDF
Share/Bookmark

Monday, June 3, 2013

HP ProLiant Server deploy VMware ESXi Suggestion checklist

1. Check VMware from HP ProLiant Server VMware Support Matrix
http://h18004.www1.hp.com/products/servers/vmware/supportmatrix/hpvmware.html

2. Check VMware: Best practices for maintaining HP firmware, driver, and system software
Using the HP Service Pack for ProLiant (SPP) and the HP Software Delivery Repository (SDR) to update the firmware and BIOS before install/deploy VMWare ESXi
http://h20000.www2.hp.com/bc/docs/support/SupportManual/c03747972/c03747972.pdf

3. Download the latest customize VMware ESXi Images for HP ProLiant Servers
http://h18004.www1.hp.com/products/servers/software/vmware/esxi-image.html

4. Consider to use HP Insight Control for VMware vCenter server
http://h18013.www1.hp.com/products/servers/management/integration.html
http://h20195.www2.hp.com/V2/GetPDF.aspx/4AA3-9197ENW.pdf

HP Insight Control
https://h20392.www2.hp.com/portal/swdepot/displayProductInfo.do?productNumber=HPICE Print Friendly and PDF
Share/Bookmark

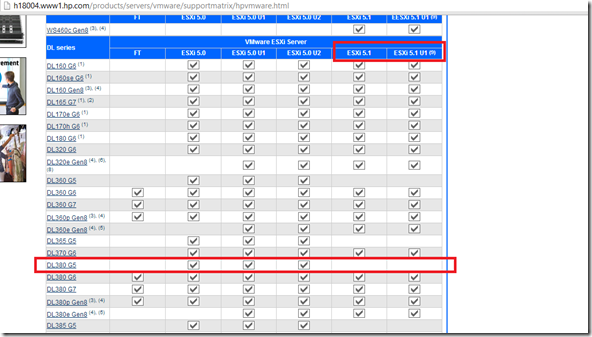
HP DL380 G5 server is no longer support by HP for VMware 5.1

HP_G5

Source:

http://h18004.www1.hp.com/products/servers/vmware/supportmatrix/hpvmware.html

Print Friendly and PDF
Share/Bookmark

Thursday, April 18, 2013

How to start the webpage when user logon by logon script (Handle both 32bits and 64bits Windows machine)

If Exist "C:\Program Files (x86)\" goto X64

start /MAX C:\PROGRA~1\INTERN~1\IEXPLORE.EXE http://intranet.abc.com

:X64

If NOT EXIST "C:\Program Files (x86)\" goto END

start /MAX "C:\PROGRA~1 (x86)\INTERN~1\IEXPLORE.EXE" http://intranet.abc.com

:END

Print Friendly and PDF
Share/Bookmark

Netlogon variable file path

If there are folder call “ABC” under Netlogon, the file path can be using the following format":

"%0\..\ABC\IT Support.url"

Example a file call “IT Support.url” under “\\xzy.com\netlogon\ABC” to "C:\Documents and Settings\All Users\Desktop\"

Copy /y "%0\..\ABC\IT Support.url" "C:\Documents and Settings\All Users\Desktop\"

Print Friendly and PDF
Share/Bookmark

Delete file last modified day over 30 days by PowerShell

$TargetFolder = "X:\30days"
$Childitems = Get-Childitem $TargetFolder -recurse |where {$_.attributes -ne "Directory"}
$mdate = Get-Date -format yyyyMMdd
foreach ($i in $Childitems)
{
    if ($i.CreationTime -lt ($(Get-Date).AddDays(-30)))
    {
Write-host $i.fullname -- $mdate
        Remove-Item $i.FullName -force -recurse

    }
}

Print Friendly and PDF
Share/Bookmark

Wednesday, April 17, 2013

Lync 2010 client (Lync online/Office 365) deployment by batch file

If Exist %systemroot%\share\%computername%.txt goto END
If Exist "C:\Program Files (x86)\" goto X64

Set ARCHITECTURE=x86

REM Install Microsoft Online Services Sign-in Assistant
if exist "C:\Program Files\Common Files\Microsoft Shared\Microsoft Online Services\MSOIDSVC.EXE" goto lync32
\\server_IP\Lync_Software\x86\msoidcli_32bit.msi /quiet

:lync32
REM Creating Lync and office suite Client folder on %systemroot%\share\
IF NOT EXIST "C:\Program Files\Microsoft Lync\communicator.exe" Copying Lync software to Lync Software folder on %systemroot%\share\
pushd "\\server_IP\Lync_Software\x86\"
XCOPY "*.*" "%systemroot%\share\Lync_Client\X86" /I /Y /Qlient\X86" MKDIR "%systemroot%\share\Lync_Client\X86"
"%systemroot%\share\Lync_Client\%ARCHITECTURE%\LyncSetup.exe" /install /silent
"%systemroot%\share\Lync_Client\%ARCHITECTURE%\Lync.msp" /quiet /norestart
Echo "Lync and Office clients Successfully installed" on %COMPUTERNAME% > %systemroot%\share\%Computername%.txt

:X64

If NOT EXIST "C:\Program Files (x86)\" goto END

Set ARCHITECTURE=x64

REM Install Microsoft Online Services Sign-in Assistant
if exist "C:\Program Files\Common Files\Microsoft Shared\Microsoft Online Services\MSOIDSVC.EXE" goto lync64
\\server_IP\Lync_Software\x64\msoidcli_64bit.msi /quiet

:lync64
REM Creating Lync Client folder on %systemroot%\share\
IF NOT EXIST "%systemroot%\share\Lync_Client\X64" MKDIR "%systemroot%\share\Lync_Client\X64"
REM Copying Lync software to Lync Software folder on %systemroot%\share\
pushd "\\server_IP\Lync_Software\x64\"
XCOPY "*.*" "%systemroot%\share\Lync_Client\X64" /I /Y /Q
"%systemroot%\share\Lync_Client\%ARCHITECTURE%\LyncSetup.exe" /install /silent
"%systemroot%\share\Lync_Client\%ARCHITECTURE%\Lync.msp" /quiet /norestart
Echo "Lync and Office clients Successfully installed" on %COMPUTERNAME% > %systemroot%\share\%Computername%.txt

:END


EXIT

Print Friendly and PDF
Share/Bookmark

Using PowerShell to enable or disable backup mode on EV 10.1

Enable backup mode

c:\windows\syswow64\windowspowershell\v1.0\powershell -psconsolefile "C:\Program Files (x86)\Enterprise Vault\evshell.psc1" -command "set-vaultstorebackupmode EVSITE sitename site"

* When the file level backup have been running on EV server (EV data folder: "Enterprise Vault Stores", "EV_CACHE", "EV_INDEX"), you will need to enable the backup mode before running the backup.

Disable backup mode

c:\windows\syswow64\windowspowershell\v1.0\powershell -psconsolefile "C:\Program Files (x86)\Enterprise Vault\evshell.psc1" -command "clear-vaultstorebackupmode EVSITE sitename site"

# When the file level backup have been complete on EV server, you will need to disable backup mode, otherwise the EV open datastore will become readonly.

Print Friendly and PDF
Share/Bookmark

Microsoft Windows Server on HP ProLiant servers and HP ProLiant server blades

As you may know that the HP Service Pack for ProLiant (SPP) replaces the Smart Update Firmware DVD and the ProLiant Support Packs (PSPs).

Before you install the Windows Server 2008 / 2012 to a HP 300 series or above server, you better check the following document to check the BIOS and firmware compatiblilty and also any recommendation from HP.

Implementing Microsoft® Windows Server® 2008 R2 Service Pack 1 on HP ProLiant and Integrity servers

http://h20000.www2.hp.com/bc/docs/support/SupportManual/c02778975/c02778975.pdf

Implementing Microsoft Windows Server 2012 on HP ProLiant servers and HP ProLiant server blades, 3rd edition

http://h20000.www2.hp.com/bc/docs/support/SupportManual/c03305495/c03305495.pdf

HP Service Pack for ProLiant Documentation

http://h18004.www1.hp.com/products/servers/service_packs/documentation/index.html

Remark: ProLiant 100 series foundation products are treated differently and are not part of Insight Foundation Suite for ProLiant. Below are the links for the foundation products specific to ProLiant 100 series servers:

  • HP ProLiant Easy Set-up CDs
  • HP LO100i
  • Easy Set-up CDs are provided for all ProLiant 100 series G6 servers and most 100 series G7 servers, with some exceptions (DL165 G6, ML110 G7 and DL120 G7).  Initial drivers for these servers are included on the Easy Set-up CD that ship with these servers and are also found on HP SC (HP Support Center) as the Easy Set-up CD ISO.

    Print Friendly and PDF
    Share/Bookmark

    HP and VMware firmware and driver support matrix

    Before install/upgrade VMware ESX/ESXi to a HP Server, you better to check the compatiblity between HP server firmware, BIOS, driver and the HP customerized VMware ESX/ESXi or VMware patch/hotfix.

    The following document will be helpful for reference:

    HP February 2013 VMware FW and Software Recipe

    http://vibsdepot.hp.com/hpq/recipes/February2013VMwareRecipe5.0.pdf

    Print Friendly and PDF
    Share/Bookmark

    Tuesday, April 2, 2013

    Acer v5-571g Atheros wifi driver bugs on Windows 8

    The Atheros wifi driver version 10.0.0.218 which is come from “Acer live update” for Windows 8 Pro (x64) seems to be got some bug when running in a hidden SSID and 5GHz environment. It cannot reconnect after the computer resume from sleep.

    The workaround solution is download the “10.0.0.217.v3” from http://www.acer.co.uk/ac/en/GB/content/drivers

    image

    Reference: The laptop have been already update to the BIOS 1.20

    Print Friendly and PDF
    Share/Bookmark

    Monday, April 1, 2013

    Workaround for push mail (EAS) did not respond (Exchange Server 2003)

    1) Get into Server and start up IIS manager
    2) Right click on Application Pools and create a new pool for ActiveSync (ie. ExchangeActiveSyncPool)
    3) Right click on the new Application Pool and Properties and set the Recycle worker processes at 1740
    4) Set Maximum Virtual memory to 500
    5) Set Maximum Memory used to 192
    6) Click on Identity tab and Select Local System for the App pool identity
    7) Down under Default Web Site right click on the Microsoft-Server-ActiveSync
    8) In Application Pool select the new pool created in step 2

    This will split out the Active sync app and won’t take down all services if there is a resource issue such a memory.

    Source:

    Remark: Do not change the “Maximum number of worker processes” of the “ExchangeApplicationPool” (Default application pool of exchange front end), it will affect webmail (OWA)

    Print Friendly and PDF
    Share/Bookmark

    AMD SB850/SB950 bug - performance issue

    If you are using AMD SB850/SB950, and also you find your hard disk running very slow. (A new purchase machine and also clean install Windows) For example, when you click a software to run, the whole windows is freezing (cannot open the other software and even the task manager, the performance and reliability monitor about the harddisk is empty (No information is show up).

    It maybe you hit the bug of the SATA IDE combined mode.

    Solution:

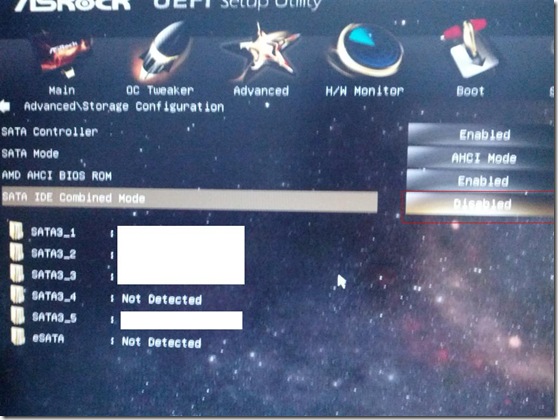
    Go to BIOS and disable the “SATA IDE Combined Mode”

    IMG_20130325_010458 (Large)

    If you cannot find this option, please make sure all the SATA connection are using RAID/AHCI. (No “IDE” option have been set for SATA device)


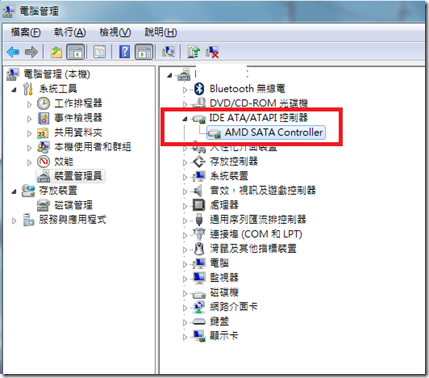
    After you make the above change, you should see the IDE ATA/ATAPI Controller – show “AMD SATA Controller” only, no other IDE device/controller.

    AHCI_Win7

    Print Friendly and PDF
    Share/Bookmark

    Friday, March 8, 2013

    All Outlook client show error “There was an error loading this item – some functionality may not be available

    If all of your outlook client got the following error message when they try to access those archive email:

    image

    The problem maybe caused by EV sevice account is it locked out.

    Solution: Unlock this account in your AD.

    Print Friendly and PDF
    Share/Bookmark

    Wednesday, February 6, 2013

    Using Windows 8 modern UI (Metro UI) mail apps to connect to Exchange Server 2003 EAS

    There are some screenshot about the email inbox, calendar and meeting item:

    image

    image

    image

    Print Friendly and PDF
    Share/Bookmark

    Planet VoIP Adapter (SIP Analog Telephone Adapter) for using Comnet Phone Service

    The Planet VIP-157 (1 FXS / 1 FXO SIP Analog Telephone Adapter) which is support ComNet Phone Service (http://www.comnet-telecom.com.hk/index.php?option=com_content&view=article&id=48&Itemid=16&lang=zh)

    image

    The sample setup procedure at the following:

    1. Go to “SIP Settings”

    image

    2. Select “Service Domain”

    image

    3. Fill-in the following information:

    “Display Name:” 35xxxxxx which is your Comnet phone number

    “Line Number:” 85235xxxxxx which is your Comnet phone number

    “Register Name:” 85235xxxxxx which is your Comnet phone number

    “Register Password:” which is the password send from Comnet welcome letter

    “Proxy Server:” which is you will able to find in Comnet welcome letter

    image

    When you active this service, you will see the “Registered” at “Status":” like the above.

    Print Friendly and PDF
    Share/Bookmark

    Thursday, January 24, 2013

    Brother HL 2140 Windows 8 Printer Driver for USB-Network Print server

    If you connect your Brother HL 2140 to a USB-Network Print server, and add this printer by using adding network printer method.

    You will ask for install a driver, you can download the following driver:

    http://download.brother.com/welcome/dlf004108/Y07C_C1-inst-win7-A2-enus.EXE

    And run this exe file to unzip (But do not execute the setup.exe, once the unzip is complete)

    Then, use broswe to the “install\usa\PCL\Win7_64” (For 64bits Windows 8) or “install\usa\PCL\Win7” (For 32bits Windows 8) for install the driver. Print Friendly and PDF
    Share/Bookmark

    Monday, January 21, 2013

    How to force Directory Synchronization for Office 365

    Force a manual Directory Synchronization for your Office 365 tenant

    Step 1:

    Login to DIRSYNC server - the server which is running the Directory Synchronization Tools

    Step 2:

    Start a PowerShell session (e.g. Open a command prompt -> enter "powershell")

    image

    Step 3:

    cd "C:\Program Files\Microsoft Online Directory Sync"

    image

    Step 4:

    C:\Program Files\Microsoft Online Directory Sync>.\DirSyncConfigShell.psc1

    clip_image002

    Step 5:

    C:\Program Files\Microsoft Online Directory Sync>Start-OnlineCoexistenceSync

    image

    Open the "Synchronization Service Manager" - Go to "C:\Program Files\Microsoft Online Directory Sync\SYNCBUS\Synchronization Service\UIShell\miisclient.exe"

    To check the action of the DS and also the result:

    image Print Friendly and PDF
    Share/Bookmark

    HP WMS Zero Client Service restart it will be able to reconnect all the T200 client

    If some of the HP T200 client connect to HP MS6200 and there are some display incorrect (e.g. some client seen the other client login screen/user session screen).

    Instead of reboot the server, restart the “HP WMS Zero Client Service” will be able to solve this issue:

    image

    Print Friendly and PDF
    Share/Bookmark

    Sunday, January 20, 2013

    Lenovo ThinkPad Edge E130 install 8GB x 2 (Total: 16GB) running Windows 8 64bits

    The Lenovo ThinkPad Edge E130 which is using Intel HM77. I try to install TWO 8GB DDR3 1600MHz RAM to this laptop and running well.

    image

    image

    Print Friendly and PDF
    Share/Bookmark

    Monday, January 14, 2013

    How to use the Outlook 2003 forms cache and to troubleshoot forms cache problems

    outlook

    The solution at the following:

    1. On the Tools menu, click Options, and then click the Other tab.

    2. Click Advanced Options.

    3. In the Advanced Options box, click Custom Forms.

    4. In the Custom Forms box, click Manage Forms.

    5. In the Forms Manager box, click Clear Cache.

    Reference:

    http://support.microsoft.com/kb/839804 Print Friendly and PDF
    Share/Bookmark

    Sunday, January 13, 2013

    Solve the problem of running Symantec EV for Microsoft Outlook 2003 on MS MPS 2011

    When you open the outlook 2003 on MPS 2011, you will got the following error from EV plug-in:

    image

    The problem is casued by the Outlvbs.dll is missing.

    Solution:

    1. To solve the problem of running Symantec EV of Outlook 2003 on MS MPS 2011, we need to copy the missing dll file “Outlvbs.dll” from a machine which is running EV and also not running in terminal server. 

    2. Copy the “Outlvbs.dll” from “C:\Program Files (x86)\Microsoft Office\OFFICE11” (A Windows 7 64 bits machine) to the MPS server “C:\Program Files (x86)\Microsoft Office\OFFICE11”

    3. And then re-open the outlook on MPS 2011.

    The problem will be solved.

    Reference:

    http://www.symantec.com/connect/forums/ev-and-citrix

    http://support.microsoft.com/default.aspx?scid=kb;en-us;302003

    Print Friendly and PDF
    Share/Bookmark

    Asus EEEPC 1008HA cannot display issue after cold boot (upgraded to Windows 7)

    This issue is caused by BIOS.

    If your BIOS is 0402 or before, you will hit this issue after you upgrade your Windows XP to Windows 7.

    The solution is upgrade the BIOS to 1103.

    http://support.asus.com/Download.aspx?SLanguage=en&p=20&s=1&m=Eee%20PC%201008HA&os=29&ft=3&f_name=1008HA-ASUS-1103.zip#1008HA-ASUS-1103.zip

    Since the BIOS 0402 is very old (There are at least BIOS release 0801 and 1001 which is newer than this BIOS) (The latest one is 1103 which is we are going to upgrade)

    You will not able to use the ASUS LiveUpdate and EZ Flash.

    If you use the ASUS LiveUpdate, you will just reboot the machine without update the BIOS.

    If you use EZ-Flash, you will hang up at “Reading file “1008HA.ROM” ”

    image

    So, you will need to use the use a USB thumb drive to boot to the DOS and run the BIOS update at Pure DOS environment.

    For the Bootable DOS USB thumb drive create and BIOS method, please check the following website for more information:

    How to create a bootable DOS USB thumb drive:

    http://www.technetsavvy.com/2011/08/how-to-format-and-create-ms-dos-98.html

    BIOS Update:

    http://www.technetsavvy.com/2011/08/how-to-revert-to-older-version-of-bios.html

    image

    After the BIOS update to 1103, the problem will be solved.

    Reference:
    http://vip.asus.com/forum/view.aspx?id=20091209230843390&board_id=20&model=Eee+PC+1008HA&page=1&SLanguage=en-us Print Friendly and PDF
    Share/Bookmark

    Critical Java zero-day attack is being protected Symantec Endpoint Protection (SEP) 12.1.2

    A new zero-day exploit in Java has been found in the wild. Currently, this exploit is being used by toolkits like the Blackhole Exploit Kit (BHEK) and the Cool Exploit Kit (CEK).

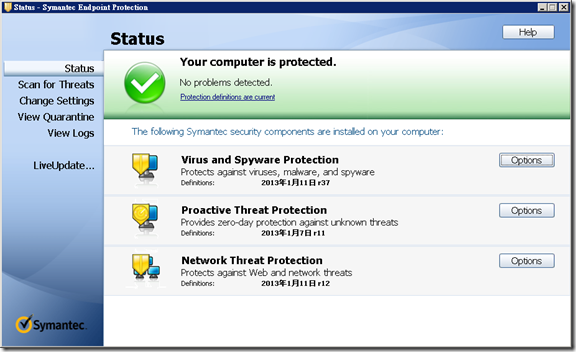
    The SEP 12.1.2 Virus and Spyware Protection Def. is 11-01-2013 r37, Proactive Threat Protection Def. is 07-01-2013 r11 and Network Threat Protection Def. is 11-01-2013 r12.

    AV_Def

    I go to the website which is able to test this vulunerability:

    image

    image

    The Java attack contect is being blocked by SEP.

    image

    image

    For more information:

    http://avpclub.alone.tw/discuz/viewthread.php?tid=44016

    http://www.ithome.com.tw/itadm/article.php?c=78317

    http://www.avpclub.ddns.info/discuz/viewthread.php?tid=45430

    http://blog.trendmicro.com/trendlabs-security-intelligence/java-zero-day-exploit-in-the-wild-spreading-ransomware/

    Print Friendly and PDF
    Share/Bookmark

    Wednesday, January 9, 2013

    Cisco Pre-shared Key Recovery

    Run the following command will decrypt those pre-shared key in the configuration file:


    more system:running config


    Reference:

    https://mebsd.com/cisco/cisco-show-run-vs-show-run-all-vs-more-systemrunning-config.html

    http://www.cisco.com/en/US/products/hw/vpndevc/ps2030/products_tech_note09186a00807f2d37.shtml

    Print Friendly and PDF
    Share/Bookmark

    Tuesday, January 8, 2013

    Windows Server 2008 R2 Rebuild Mirror (Windows build-in software RAID 1)

    <You must backup all the data before to rebuild mirror>

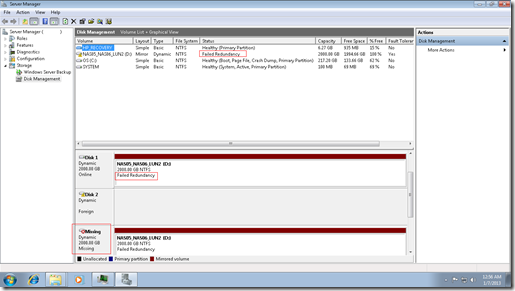
    There are mirror volume (RAID 1) have been created by two physical disk (Disk 1 and Disk 2)

    The Disk 2 volume is become missing and it is become “Foreign Disk” like the following:

    1

    The solution is the following:

    1. Full backup the disk 1 (The disk and volume is still healthy).

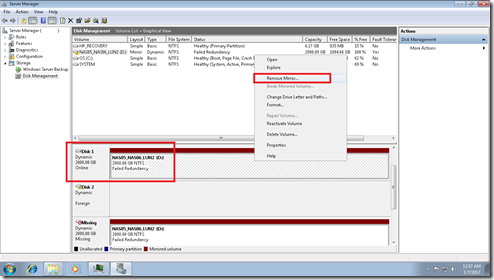
    2. Select Disk 1, right click, “Remove Mirror ….”

    2

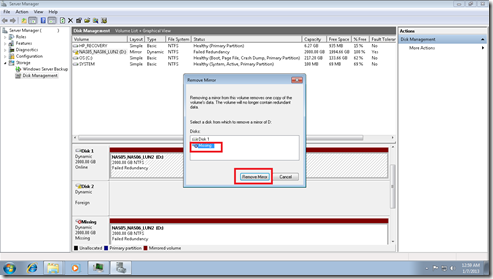
    3. Select the “Missing” disk and Remove mirror.

    3

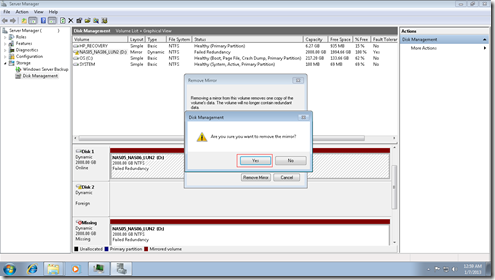
    4. Click “Yes”

    4

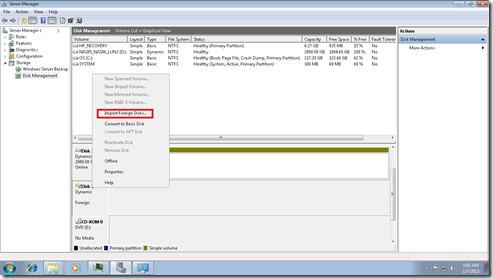
    5. Select the “Foreign Disk” and right click, then “Import Foreign Disk……”

    5

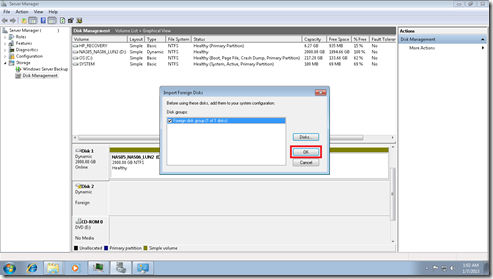
    6. Press “OK”

    6 

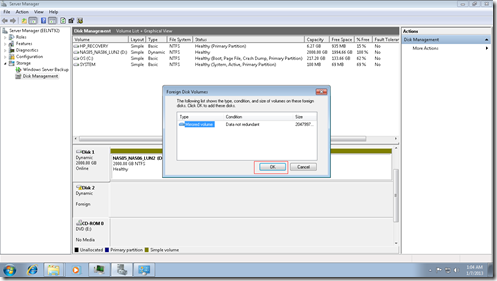
    7. Press “OK”

    7

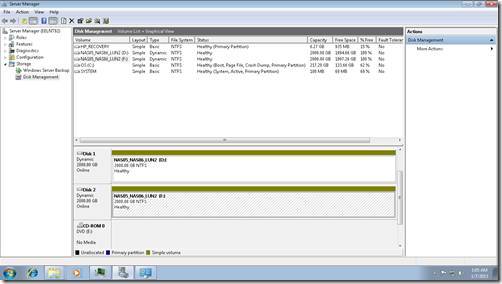
    8. You will got a new volume like the following disk 2:

    8

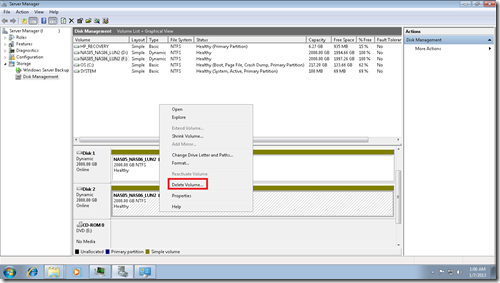
    9. Select disk 2 (which is you just import) and delete the volume.

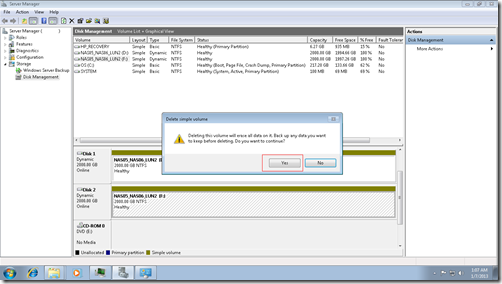
    9

    10. Press “Yes” (Check the selected volume very carefully, do not select the wrong volume, otherwise all data will be deleted)

    10

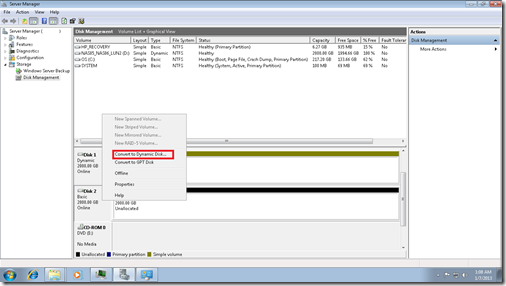
    11. Select disk 2, right click and select “Convert to Dynamic Disk….”

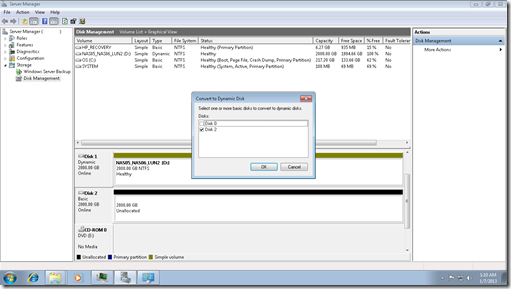
    11

    12. Press “OK”

    12

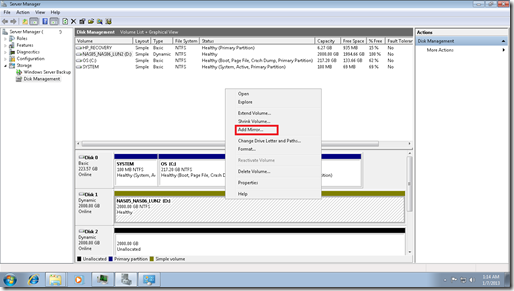
    13. Select disk 1 and right click “Add Mirror….”

    13

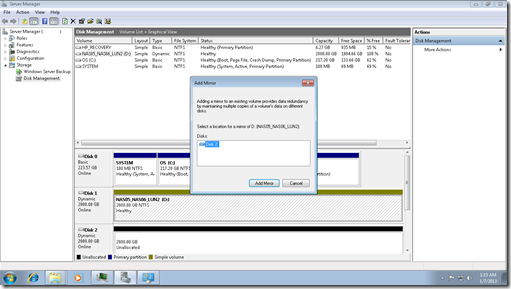
    14. Click “Add Mirror”

    14

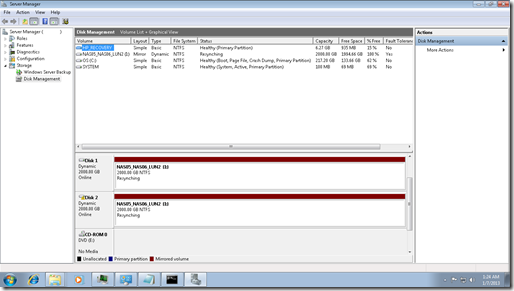
    15. The mirror have been start to rebuild now. (Remark: I also change the drive letter for identify only)

    15

    Print Friendly and PDF
    Share/Bookmark